
Need to go somewhere? The first thing most people do is getting out their phone and punch in the destination address into something like Google Maps. You get step-by-step driving directions and can even view the destination in Google Streetview to get some impression of what to expect once you get there.
I still remember the time when my dad bought our first car navigation system. It was a “TomTom” which was manufactured by a Dutch company with the same name. This little device brought us much joy and saved us a lot of trouble by taking us directly where we needed to be. I still remember when it instructed us to take a ferry while we were on vacation. This might not seem so special at first hand, but as a young boy, it felt epic.
Tools like Google Maps or Apple Maps are useful when planning a simple trip with the car, but are often lacking when you try more complex things. I like to walk and ride my bike in my free time. I created my first walking route in Google Maps. I would then walk the route and periodically check my phone to ensure that I was still on course. This approach worked but wasn’t ideal.
My phone at the time didn’t have the best magnetic compass and GPS receiver. It always took some time for the phone to get a proper location lock and there were more than enough times when the compass pointed me in the wrong direction, requiring me to backtrack a part of the route. Google Maps also limited the amount of manual changes I could make to a route so I could never get them exactly how I wanted to.
I was getting quite upset with these limitations and did what I always do in such cases: Throw money at the problem. I bought myself a Garmin GPSMAP 66s navigation device. In hindsight, I could have gone for a cheaper model like the Garmin eTrex and still be fine. I was however too afraid to miss out on any features I might need.
Since then me and my GPSMAP were inseparable on my walks. It’s the first thing I reach for when it’s “Walking Time” or “Walking o’clock”. Later on, I also bought a Garmin Edge Explore for my biking trips and a Garmin DriveSmart for my car trips.
It did however take some time for me to get used to using these products. The Garmin ecosystem can be quite complex. My GPSMAP didn’t even have a map installed on it when I got it. I therefore wanted to dedicate an entire blog post to explaining how all this stuff works. This post is therefore an interesting read for people who find products like Google Maps too limiting and want something more in order to properly plan a vacation or road trip.
Basic terminology
Let’s discuss some basic terminology before we proceed any further:
- Waypoint; A waypoint is a point of interest. It’s something you may want to visit. A waypoint is essentially a set of GPS coordinates with some extra information like an address, phone number or website link. Each waypoint is displayed on the map with an icon (usually a flag).
- Trail; A trail consists of a list of GPS coordinates. You have to follow these coordinates one by one. It helps to see the coordinates as breadcrumbs. Trails can be created by hand but are usually recorded by a GPS device of someone who walked the trail before you. You are therefore walking in someone else’s footsteps. Trails are quite static and difficult to edit. They are used when following a precise path to a destination is important.
- Route; A route is calculated between two or more waypoints. Your GPS device will calculate the route by using the map it has installed. Routes are quite dynamic and can be recalculated at any time. They are used in situations when visiting certain spots is important but you don’t particularly care how to get there.
- Activity; This is Garmin’s version of a trail. A trail is just a set of coordinates while an activity can also include data like your hard rate.
- Course; Again, this is just Garmin’s version of a route.
- GPX-file; A file containing waypoints, trails and routes. You will stumble upon these files when you try to download trails and routes from others on the internet. All these files have the ‘.gpx’ file extension and can be imported into your route planning software or directly copied to your device. You can also export your own routes and trails and share them with others.
Garmin services
Garmin offers different services and software products. Each of them has a different purpose:
- Garmin Connect; Service focused on sports and activity. Can be used to keep track of your Walking, Biking, Swimming, Fitness and Running activities. You can also use this service for creating routes. Routes can be sent to your Garmin device through your Smartphone. Your Garmin device will sync your activities with your phone. You can use Garmin Connect by installing the App on your Smartphone but you can also use the web interface.
- Garmin Express; Application used to update your Garmin devices. Only available for Windows and macOS. Although Garmin Connect can to send updates to connected devices, Express is the most reliable way to do it. Especially Map updates can better be done through Garmin Express since they can be quite large. The application can also be used to sync your device with the Garmin Connect service. This is a nice option for people who don’t own a Smartphone but do want to use the Connect service.
- Garmin Explore; Service focused on Hiking. It’s like a remote control for your Garmin device. You can use it to create routes, keep them in different collections and sync them to your device. Garmin Explore is available as a Smartphone App but also has a web interface like Garmin Connect.
- Garmin Basecamp; Basecamp is an application you can install on Windows or macOS, just like Garmin Express. Basecamp allows you to manage your waypoints, trails and routes and sync them with your devices. It’s an older application, but it’s the only one that covers just about anything. I also like the fact that it runs on your own system so you are now dependent on an internet connection. You can only sync with your devices with a USB cable while the other services rely on a Bluetooth connection and a Smartphone app. Using a cable is more cumbersome, but in my experience far more reliable. You can download Basecamp from the Garmin website.
I am pretty disappointed with the fact that Garmin isn’t putting any effort into Basecamp anymore because there isn’t a good alternative for it. The Connect service is more focused on health and sports rather than planning trips. Explore does seem to be somewhat like Basecamp, but it’s solely focused on hiking and still lacks many features.
I also have a bit of a problem with the phone-centric nature of the services. Why would I plan a route on my smartphone when I have a 24-inch monitor in front of me? It’s nice that you have the option to, but these are not things you do in the field. You do them at home in front of your desk in the comfort of a warm cup of tea.
And sure, both Connect and Explore have web interfaces so you can do the work from your computer if you want to. Web interfaces will however never beat the performance of installed applications. I need something fast, responsive and reliable. The Garmin web interfaces just aren’t up to the task.
I will focus on Basecamp for the rest of this post. Just know that there are other options out there.
Garmin devices
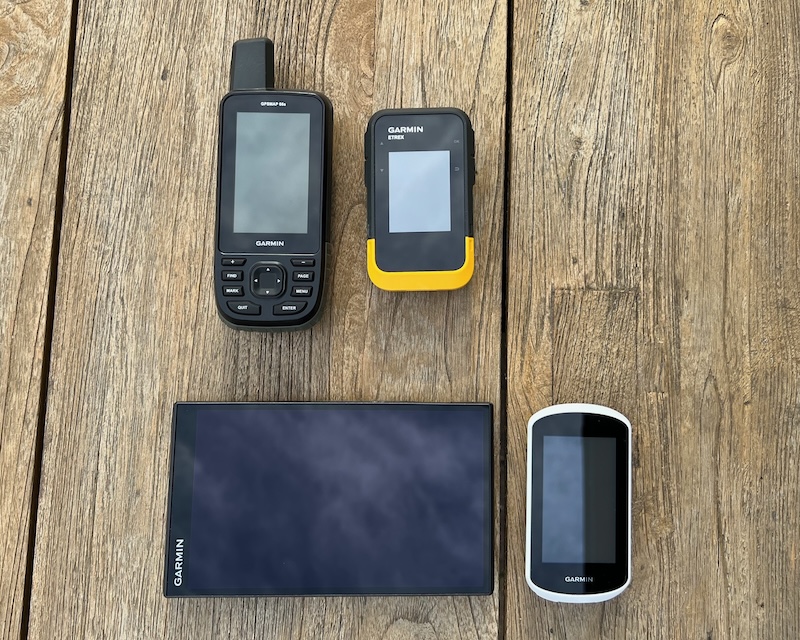
From left to right, top to bottom: Gpsmap 66s, eTrex SE, Drivesmart, Edge Explore
I have already talked about the fact that I have several Garmin devices in the introduction of this post. I have a GPSMAP 66s and an eTrex SE for my walks, an Edge Explore for my bicycle rides, and a Drivesmart for my car rides. I will use this section to describe my experiences with these devices and give you an idea of what to expect from them.
The GPSMAP 66s
This is my first Garmin device. It’s a big bulky beast, but I love it. I used to clip it to my backpack with the Carabiner attachment that came with it. I later upgraded to the Backpack Tether so I could detach the device more easily.
The GPSMAP is a device that can do just about anything. You can record your trails and use it to create routes and waypoints. It also comes with a calculator, alarm clock and stopwatch. The device has a built-in LED flashlight. You can use it to light up your surroundings or call for help as it can send an SOS in Morse code.
The device is however more difficult to carry than something like a Garmin eTrex 30. You can’t just slide this thing into your coat pocket. You have to carry it on your belt with the Carabiner or the clip attachment. You can also strap it to your backpack with the tether attachment.
Info
You might want to buy the NiMH Battery Pack for the GPSMAP if you want to change your device with a charging cable. It’s better than having to swap out AA batteries all the time. The device will last about 16 hours on one charge.
Installing Openstreet maps on your GPSMAP
The GPSMAP is delivered without any maps installed on it. You can buy maps from Garmin and install them through Garmin Express. The most popular option is however to install the Openstreet maps on the device. This is the preferred choice because it is free.
Follow the following steps to install maps on your device:
- Download the maps you need from one of the following websites:
- Connect your Garmin device to your PC with a USB cable.
- Your device should show up as a detachable storage device on your PC.
- Ensure the files you have downloaded have a ‘.img’ file extension. You might need to unzip a downloaded file if it has a ‘.zip’ file extension. Files with the ‘.gmap’ file extension are for Garmin Basecamp and are not suited for the device itself.
- Copy the img file to the ‘garmin’ folder on the device. Create the folder if necessary.
- Safely detach the device.
- Turn the device on.
- Go to the “Setup” menu from the main menu.
- Select the “Map” menu
- Select the “Configure Maps” option
- Enable all the maps you need to use by using the toggle switch
You can also enable and disable maps from the map overview:
- Press the “MENU” button on the device
- Select “Map Setup”
- Select “Configure Maps”
Info
Many Garmin devices have a Micro-SD extension slot. You can copy the maps to the card and insert it into your device. This is useful if the internal storage isn’t large enough to hold everything. Ensure the maps are placed in a folder called ‘garmin’.
Setup your GPSMAP for car driving
As said before, the GMSMAP is a device that can be used for all kinds of activities. The device comes preinstalled with different profiles. You have profiles for Hiking, Cycling, Mountainbiking, Hunting, Fishing, Climbing and Geocaching. The is no profile for car/motorcycle driving, however. Luckily, you can create your own custom profiles.
Follow these steps to create a custom profile for car or motorcycle driving:
- Go to “Setup” from the main menu.
- Select “Profiles”.
- Select “Create profile”.
- A new entry will be added to the end of the profile list. The name is something like “profile 8”. Select this entry and use the “Edit Name” option to set a proper name for this profile. Something like “Car driving” or “Motorcycle driving” will do.
- Go back to the setup screen and open the “Routing” menu
- Select the “Activity” option and then select the proper activity from the dropdown menu. Select “Automobile Driving” or “Motorcycle Driving”.
- Go back to the setup screen and open the “Map” menu.
- Select the “Orientation” option and select “Automotive Mode” from the dropdown menu.
- Go back to the setup screen and open the “Recording” menu.
- Select the “Activity Type” option and select “Other” from the dropdown menu
You are now set! You can switch profiles in the “Profiles Change” menu located in the main menu. The device won’t give you spoken directions because it is not equipped with a speaker. It will however make beeping noises whenever it needs your attention.
I prefer a separate device such as the Garmin Drivesmart for my car rides, but the GPSMAP can be a good backup option.
The Edge Explore
The Garmin Edge series are navigation systems for cycling. The normal Edge is more focused on sports activities while the Edge Explore is more focused on exploration (as the name suggests).
It’s important to know that the normal edge only supports navigating configured routes that get sent to it through Garmin Connect of Basecamp. You can’t just punch in and address and go. The device doesn’t come with a touchscreen. You have to control it with buttons on the side. The Edge Explore does support this (and comes with a touch screen).
The Edge Explore comes preinstalled with maps, so you don’t have to install them yourself like with the GPSMAP. It works just like any other navigation device. You can give it a destination you like to go to or select a route you have created with Connect or Basecamp.
The device can also generate a route for you. You tell it in which direction you like to go (North, East, South or West) and how long the route needs to be. It will then give you around three possible options. Pick one option and cycle away.
I don’t have too many complaints about the Edge Explore. It does what it does and is quite reliable (for a Garmin device). My old big frustration is that the device is slow with calculating routes. It can sometimes take 3 to 5 minutes to calculate a route (I do have the older 2019 model though). It also does the calculation twice under certain conditions.
When you start a route and you are not near the starting point, the device will kindly offer to give you directions to the start of the route. If you accept this offer it will continue calculating the whole route. Once you arrive at the starting point, it will start calculating the whole route again. This is just unnecessary.
The Drive(smart)
The Drivesmart is Garmin’s car navigation. The product comes in two flavours the Drive and the Drivesmart. What makes the Drivemart so much smarter than the regular Drive you might ask? Nothing much really. The Drivesmart just has more connectivity options.
The Drivesmart can connect to your phone over Bluetooth and has built-in WiFi. It allows you to make handsfree calls and distracts you with notifications from your phone while you drive. The device can also connect to your local home network and use it to download map and firmware updates.
I think the Drivesmart is an alright device. I think it’s better than the Tomtom navigation system my mother uses. The device is equipped with Garmin’s special screen technology which means that the screen is clearly readable in direct sunlight. It also has a small befell as well, which gives it a modern look.
The thing that Garmin did really well is the user interface design. You can clearly see a big difference with Tomtom here. You see, Tomtom decided to make their interface look like a Powerpoint presentation. And I don’t mean those corporate ones where they just paste walls of text on each slide and basically just use it as a word processor.
I mean the ones most teenagers make when they have to present about a certain topic in front of their class. You know, those filled to the brim with animations. Every slide, every picture, every bullet point. It all has to be animated! And don’t forget the silly sound effects too!
I think the clearest way to prove my point is to compare the (virtual) keyboards of both devices:

As you can see, the Garmin keyboard is simple but practical while the Tomtom keyboard is stylish but less practical. The buttons are smaller, making it difficult to put in a destination. I also think the transparent interface of Tomtom is stylish but too distracting.
I like how the Drivesmart has a built-in route editor. You can send routes to the device by using Basecamp but also create and edit routes on the device itself. I think this is great since I use Basecamp to create all my routes but also regularly be the editor to do last-minute adjustments.
There is one last thing before I shut up about the Drivesmart: I really love the Trip Advisor integration and the ability to quickly find a parking spot. The people at Garmin understand that you can’t drive your car straight through the building entrance and have to leave it at a parking lot and enter the building on foot.
Whenever you select a destination on the Drivesmart, there is also the option to navigate to a parking lot close to the destination instead. You simply press the “P” button and the device will present you with a list of possible places where you can leave your car. Why don’t other navigation solutions like Google or Apple Maps have this? It saves you so much effort.
eTrex SE
The eTrex SE is a relatively new device in Garmin’s lineup. Don’t make the mistake of confusing it with de regular eTrex 22x or 32x. It’s a different type of device. You see, Garmin figured out that most people already have a screen where they can view maps on, it’s their smartphone. So why would their devices also need a good screen while people can just configure everything on their phones and send all the relevant information over via Bluetooth?
And this is how the eTrex SE was born. It’s a small device with a simple black-and-white display. It has no maps installed and will simply display your route as a black line on a white background. You can pair the device with your phone and control it through the Garmin Explore app. Here you can view your location on a map and send trails to the device.
It is important to know that the eTrex SE cannot fully function on its own. It relies on a connection with a smartphone.
I bought the eTrex SE because I was looking for something less bulky than the GPSMAP. I wanted something that I could take with me on shorter walks. Maybe something like an activity tracker.
But honestly, I don’t know what to do with it. The tracking of my daily walks around the block didn’t go so well because the device does not report how many calories I have burned. Both the GPSMAP and Edge Explore do this but the eTrex SE just keeps it blank.
This is no fun when you use something like the Apple Health app to track your daily calorie burn. It’s like the walk was for nothing. I just ended up relying on the step counter of the iPhone.
So it’s not suitable as an activity tracker. Maybe I can use it for city navigation? The GPSMAP is an expensive device. It might be pulled from my hand at an unguarded moment. Maybe it’s smarter to walk around with a cheaper device.
It sounded like a good plan but I prefer to use the GPSMAP in cities. It’s just nicer to have a detailed map of the city on your screen and it’s easy to look up someplace to eat and turn-by-turn instructions on how to get there without having to get out your phone.
The whole fear of theft was also solved when I bought the tether attachment. Someone can grab the device from my hands, but it will still be connected to my backpack with the tether.
If you are contemplating on buying an eTrex and you can’t decide between the SE and 22x/32x: Buy the 22x or 32x, preferably the newer 32x because it has an electromagnetic compass.
I understand Garmin’s reasoning for developing this device, but it just offers too little. Or maybe I have just been too spoiled by the GPSMAP, who knows? You might like the SE if you really want something minimalistic or just need a backup device in case your main device breaks down.
My experience in general
Garmin devices certainly don’t lack in functionality. They offer just about anything you will ever need and more (except for the SE). The thing that does bother me is the reliability of Garmin’s products. The devices all have a tough exterior on the outside but I have had my fair share of problems with what’s inside of them.
I have come to like my GPSMAP, but you have to know how to avoid the software bugs. My first problem was the screen power save option bug.
The device has an energy-saving option where it will power down the screen instead of just dimming it after a configured timeout. You wake the device up by pressing the power button. Sounds convenient right? Yes, this feature helps with conserving power, but it also has a chance to freeze up the device. You then have to force a restart by holding down the power button. The device will reboot and function again, but you will lose a part of your activity recording.
And this is just one example. Other problems include:
- The battery indicator being wrong. The device would indicate that the battery was almost empty while it was almost fully changed. I had this with the Edge Explore and the GPSMAP with the Garmin battery pack. The battery percentage would just drop from 80 to 30 percent for example.
- The road to follow isn’t highlighted. Had this problem with the Drivesmart. The device would still give text and voice instructions, but the road to follow wasn’t highlighted on the map.
- Synchronization issues with Garmin Connect. I have this problem the most with the GPSMAP. Synchronization either doesn’t work or is very slow. Killing the Garmin Connect app and opening it again usually solves it.
- I have had issues where the GPSMAP would just stop recording the route. Especially when I take a wrong turn somewhere and have to backtrack. It will just draw a straight line from where I left the trail to where I stopped the recording.
- The Drivesmart has a weird habit of sending me in a certain direction and then telling me to turn around. It happens at intersections. It will for example tell me to take a left, tell me to turn around and take another left when I arrive back at the intersection instead of just telling me to go straight ahead.
- I have had issues where the Drivesmart sends me to the previous waypoints instead of the next waypoint when I decide to use the skip waypoint feature.
These issues can be frustrating to deal with, especially when you are on the road. It’s also not something you expect. One of the main reasons I buy dedicated devices is because I need better reliability than a smartphone can offer.
Nevertheless, I still think dedicated devices for certain activities are preferable over just using your smartphone. I tried using my phone for cycling navigation in the beginning and it just didn’t work out.
The screen of the phone jumped to full brightness because the sun was shining directly on it. Garmin uses a different screen technology than your usual smartphone. The screens of their devices are properly readable even under direct sunlight. They also don’t radiate light as smartphone screens do. This makes these screens easier on the eyes.
It’s also way more convenient to use a dedicated device for walking or hiking trips. You don’t have to take your phone out of your pocket every time you want to know if you are still on track. You can just slap this brick onto your backpack strap and it will beep at you when you go the wrong way. You also don’t have to worry about rain or sand and you can easily swap batteries if needed.
Using Basecamp
As explained earlier, Basecamp is the tool you want to use if you mean business. Sure, Garmin Connect and Explore can do some things for you but Basecamp has it all. I use it for managing car trips and hiking trails. I also use it to keep track of interesting places I want to visit.
Basecamp is a useful tool to use but can seem a bit complicated when you first start out. This section is dedicated to explaining how to set up and use this piece of software.
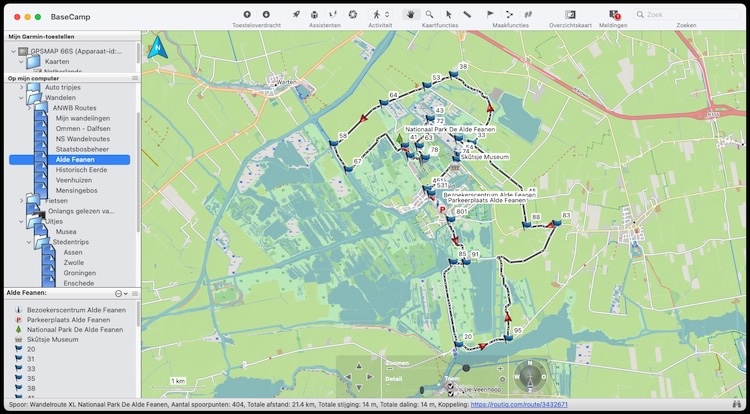
When you start up Basecamp, you will be presented with a main window composed of four panels. The right panel displays the map, the top left panel displays any devices which are connected to your system, the middle left panel shows you the directory structure and the bottom left panel shows you all the objects which are in the selected folder. You will also see a toolbar at the top of the window with a collection of buttons.
Objects like routes, trails and waypoints are kept in itemlists. These itemlists can then be organized by putting them in folders. You can have a folder for all your walking routes and another one for all your car routes for example. It is recommended to create a new itemlist for each trail or route so you can easily separate them.
As you might have noticed, Basecamp only comes with a basic map preinstalled. You will need to install more detailed maps if you want to make full use of the application.
You have two options:
- Install a Garmin map
- Install an Openstreet map
Installing Garmin maps on your local system
This most logical choice is to install a more detailed map from Garmin. Some Garmin devices allow you to use their installed maps within Basecamp. You can check this by simply connecting a Garmin device to your PC or Mac with a USB cable. Open up Basecamp and check if the device shows up in the top left column, then check if its map shows up in the map menu at the top of your window.
Note that not every Garmin device supports this. Of all the devices that I own, only the GPSMAP and the Drivesmart support this. This is the main reason why I use Garmin Connect for my bicycle routes and Basecamp for my car and walking routes.
Install Garmin DriveSmart map on your local system:
- Ensure Garmin Basecamp is closed
- Connect the device to your PC/Mac
- Open Garmin Express
- Select Device
- Press “mapdetails”
- Press “options”
- Press “install on computer”
- Agree to the terms and conditions
- The Express software will now download the map to your computer. Wait for the download to finish
- Close Express
- Open Basecamp
- Ensure the proper map is selected (use the Maps menu at the top of your window).
You may have to repeat these steps when your Garmin device gets a map update.
Installing Openstreet maps on your local system
Alternatively, you can install a map based on Openstreet map and use it in Basecamp:
- Ensure Basecamp is closed.
- Download the maps you need from one of the following websites:
- Ensure the files you have downloaded have a ‘.gmap’ file extension. You might need to unzip a downloaded file if it has a ‘.zip’ file extension. Files with the ‘.img’ file extension are meant to be used on Garmin devices and are unusable by Basecamp.
- Simply double-clicking on the gmap file should be enough to install it.
- Startup Basecamp again.
- Select the newly installed map in the Map menu at the top of the window.
- The map should now be displayed in the right panel.
Creating your own (road)trip
After all the explaining, reviews and setup instructions, we can finally proceed to the main topic on this post: “How do you actually create your own trips”. Well, it’s quite simple.
First, you look for interesting activities or stops and create a waypoint for each one. Then you select all the waypoints you want to include in your route (you can do this by selecting waypoints in the bottom left panel while holding the Control/Command key). Right click on the selected waypoint and select the “Create route from waypoints” option in the context menu.
A new route object will be added to the selected itemlist and a route edit window will pop up on your screen. This window will list all the waypoints which are included in the route. You can change the order by simply dragging waypoints up and down the list. You can also add additional waypoints by dragging them into the list from the object panel.
Warning
Ensure that you have the right activity selected for your route. You view and change the activity type in the right top corner of the route window.
As a finishing touch, you can change the route by making some small edits. Normally, basecamp and your GPS will calculate the quickest route to the next waypoint. But there are times when you want to force it to take a different route. You can do this by dragging a part of the route to a road you want to force it to use. This will cause Basecamp to create a new waypoint and add it to the route. You won’t see this waypoint in the object panel but it will be present in this list of waypoints in the route window.
Warning
It is recommended to silence waypoints you don’t plan to stop at. You can do this by right-clicking on a waypoint in the route window and selecting the “Don’t warn at arrival” option. This will grey out the waypoint and add the “(no warning)” postfix to it.
It might not seem like much but this will save you a lot of problems where your GPS will stubbornly try to force you to turn around because you didn’t pass this point. Silenced waypoints are not announced by your GPS when you pass them, they are seen as optional. Your GPS won’t make a fuss when you don’t pass them will simply send you to the next point on the route.
You also have the ability to import the waypoints, routes and trails of others. This information is distributed in the form of GPX files. Use the import option from the File menu to import objects from a GPX file into the currently selected itemlist.
Using routes instead of trails
As discussed earlier: A route is a calculated path of travel between waypoints while a trail is just a long list of coordinate points that you have to follow one by one. Routes are in my opinion the preferred choice in most cases because of the following reasons:
- Routes are easier to maintain since they are freshly calculated in the most current map data.
- Routes are easier to edit. You can easily customize a route to your liking by adding and removing waypoints.
- Routes are more dynamic. Your GPS can recalculate an alternative route when you miss your turn or a road is closed. Trails are static, you have to figure out an alternative route for yourself.
- You will get turn-by-turn instructions from your GPS when following a route. My GPSMAP with beep once when a turn is coming up and will play a different tone when it is time to take the turn. It won’t do this when following a trail. It will beep once if you are off-track and once again when you are on-track.
I only see trails as a valid option when you are not following a mapped road. They are too high maintenance and inflexible for anything else.
It is therefore beyond frustrating to see just about everyone share their work as trails. Although I can understand using them for hiking trails, I have seen people use them for things like road trips as well. You don’t want to be in a situation where you are in a car or on a motorcycle and only have a dotted line to follow.
You need to know which turns or freeway exits to take far in advance, so you have time to make the proper preparations. You will get this with routes but not with trails. You also don’t want to get into situations where you have to pan around on a map to find an alternative route because a part of the trail is not accessible anymore. It’s not always easy to find a safe spot to park. You want your GPS to quickly provide you with an alternative route.
If using a route in favor of a trail is preferable, then why are people not using them? You so often see situations where some dude (or dudette) jumps into a car, presses the record button on their GPS, drives the route and uploads the resulting recording. Why go through so much effort for so little result?
These recorded trails also have the additional problem of being inaccurate. This is because GPS devices don’t record your location with pinpoint precision, so the trail points don’t always align with the road. You also have the occasional connection loss. This can cause a trail to miss several coordinate points and can make it unclear which turns were made.
I often end up having to recreate the trail as a route. Basecamp does have an option to convert trails to routes, but these converted routes don’t behave the same way as normal routes. They are static and can’t be edited and changed as normal routes can. These converted routes are basically “Trails in disguise”.
So, if you are planning on creating and sharing your favorite hiking trails and road trips, please use routes instead of trails! You can ways include both of course, but routes are so much more useful when following mapped roads and paths. Just create the waypoints and let the GPS figure out how to get there.
Closing words
Wait? You actually managed to read everything up to this point? All my jabbering about different devices and the whole Route vs Trails discussion didn’t turn you away? Good for you! Don’t forget to congratulate yourself for reaching your daily reading quota.
I truly hope this post will help people with planning more complex trips, where you are not simply dealing with a drive from A to B. Also, know that you are not required to use Garmin devices and software to achieve this. They are the biggest player out there, but there are alternatives.
You can use QMapshack as an alternative for Garmin Basecamp and can use a mobile app like Osmand to navigate on your phone instead of using a dedicated device.
Now go out there and explore!