
This post is part of a larger series. You can find all posts over here.
Welcome to the second blog post in this blogging series. I recommend reading the introduction post before starting with this one. Email is one of the oldest ways to communicate on the world wide web. And since the internet was created with openness in mind, so it shouldn’t come as a surprise that e-mail wasn’t designed to be very secure. Sending an e-mail is like sending a postcard. Every party involved in the delivery process can read the contents of the message. From the people working in the distribution centers to the mailman who delivers the card to your door.
The solution to this problem is to encrypt your e-mail. This makes the mail unreadable to anyone who is not in possession of the decryption key. You and the recipient(s) of your message will need to install the proper encryption software to handle the encryption and decryption operations. The most popular encryption software choices are OpenPGP and SSL/TLS. I will discuss both choices in the following two sections.
SSL/TLS
Secure Sockets Layer (SSL) and its successor Transport Layer Security (TLS) are encryption protocols. I won’t bore you too much with the technical details, but there is one thing I want to highlight here. It’s not the way the protocol can encrypt and decrypt a message, but the way the sender and receiver of the message can be verified. You see, encryption is fine and all, but it has limited use when there are no guarantees that the recipient of the message is actually the intended recipient. And how can the recipient verify that the message actually came from the listed sender?
Let’s clarify this problem with a real-world example. In most counties, you are only allowed to drive a car after passing the driving test. Passing the test shows that you have the knowledge and skill to safely drive a car. But how can a police officer verify that you have passed the test? A police officer cannot trust everyone on their word. People can lie after all. The government therefore gives everyone who passes the test a plastic card which acts as proof of their accomplishment. We call his card a driving license.
Whenever you get pulled over by the police, you can present the officer with your license. The officer might not trust you as an individual, but they will trust the government. There can even be more complex trust relationships. You might get pulled over when on vacation in another country. The police officer does not trust you as a person, but they do trust the authority of their own government, which in turn trusts your own government, which trusts your ability to drive a car.
SSL and TLS have a similar solution to this problem. There are certificate authorities that can create and distribute certificates to those who need them. A company can act like a certificate authority and provide certificates for all its employees. The employees can use these certificates to verify the identity of each other.
The company can also create a trust relationship with a commercial certificate authority, allowing the employees to prove their identity to people outside the company like their customers. This concept is called a “chain of trust”. Everyone trusts the commercial certificate authority, the authority trusts the company and the company trusts its employees.
The most popular application for doing everything SSL and TLS related is OpenSSL, but there are also alternative solutions such as LibreSSL, GnuTLS and WolfSSL.
Warning
It’s important to know how the terms SSL and TLS are used. As previously said: TLS is the successor to SSL, but people also use both terms interchangeably. The SSL protocol has been deprecated and should not be used in production environments. So when someone uses the term SSL, they are probably referring to TLS. We nerds don’t like change too much and simply keep using the term SSL, even when the name was changed to TLS. I will just use the term TLS from now on.
Warning
You might stumble on to the term “S/MIME” when doing your own research into mail encryption. S/MIME stands for Secure/Multipurpose Internet Mail Extensions and is a standard for encrypting and singing e-mail messages (MIME data). S/MIME does not do any encryption in and of itself, it simply describes how the encrypted data should be packaged and presented to the receiver of the message. OpenPGP has its own standard for this called OpenPGP/MIME.
I decided to use the term “TLS” because I wanted to focus on the tools that actually do the encryption and signing operations.
Info
The cost of certificates can highly differ depending on what your situation is. These are the things you need to think about:
- Certificates come with different assurance levels (also known as classes). There is usually a lower assurance level where only the e-mail address is verified and a higher level where information about the business is also verified. You can get a lower class certificate for around € 20 to € 100 a year (for personal use). A higher one will cost you around a € 50 to € 400 (for business use).
- Think about how you are going to manage these certificates. Each newly onboarded employee will need their own certificate and you will need to revoke the certificate of every off-boarded employee. Issued certificates will also need to be renewed after a period of 1 to 3 years.
OpenPGP
PGP stands for Pretty Good Privacy and is the name of an encryption application developed by Phil Zimmermann in the 90s. OpenPGP is an open standard of PGP. This open standard allows others to make their own implementation of PGP. GNU Privacy Guard (abbreviated as GPG or GnuPG) is such an implementation. This application allows you, just like with OpenSSL, to encrypt and decrypt data. One of the biggest differences between TLS and OpenPGP is the way they handle trust relationships.
TLS works with certificate authorities, creating a chain of trust. The authorities take care of all the complex procedures. You provide them with the necessary information and pay them a fee for their services. The authority will review and confirm the validity of the information and provide you with some kind of proof of identity if everything checks out. But what happens when the authority refuses to give you this proof? There are enough people in this world who cannot leave their county, because their government refuses to provide them with a passport and you can’t cross the border without one.
OpenPGP makes no use of central authorities. Its users create trust relations between themselves instead. It uses a web of trust instead of a chain of trust. Each user starts with creating a key pair. Each key pair consist out of a public and private key. One key is used to encrypt a message and the other is used to decrypt a previously encrypted message. We call this asymmetric encryption since different keys are used for the encryption and decryption process.
Apart from the key material itself, the public key file also contains information like first- and last name, e-mail address and can even contain a picture of its owner. This public key acts as the user’s proof of identity. It’s then up to the user to get their key certified by other people. These people can be friends, colleagues or other acquaintances. And let’s not forget that this user can also certify the public key of others by using their own private key. This system always reminds me of an advertisement strategy we Dutch people call “Mond tot mond reclame” which translates to: “Mouth to mouth advertising” (I believe this is revered to as “Word of mouth” in the English language).
If you are a business owner and deliver a proper product or service to your customers, those customers will recommend your business to their friends. Those friends will then pass the message along and will give the same recommendation to their friends, creating an ever-increasing web of potential customers.
Why is nobody using this?
You might be thinking: “Nice story and cool software, but I don’t know anyone in my circle of friends who is actually using this nor have I heard any mention about these solutions before”. This is a valid point. Both TLS and OpenPGP have some major drawbacks preventing them from being used on a wide scale for e-mail encryption. TLS is the most user-friendly since most modern e-mail clients such as Outlook, Apple Mail and Thunderbird support it out of the box. The Certificate Authority will also do most of the heavy lifting for you, but they expect to be paid for their services.
A normal user is not going to pay 40 euro’s a year to get a nice checkmark behind their name. TLS is therefore more popular in corporate environments. Businesses either manage their own certificate authority or let a third party handle this task for them.
Info
Most e-mail applications will display a checkmark behind the sender’s name when the e-mail is digitally signed and successfully verified. Clicking on this checkmark will display some technical information about the sender’s certificate. Here you can see how this looks in Apple Mail on iPadOS:
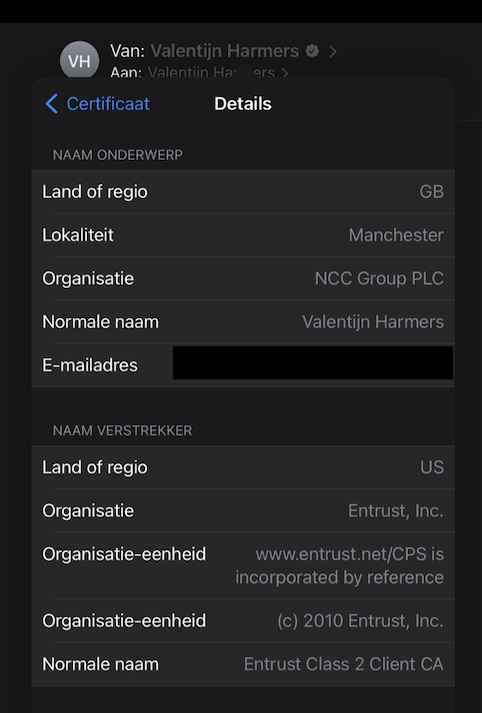
The interface language is in Dutch, but you should still be able to make out some information such as my name (Valentijn Harmers), the name of my employer (NCC Group) and the name of the Certificate Authority who provided the certificate (Entrust, Inc).
So TLS is too pricy for non-business users, what about OpenPGP? The software for using OpenPGP is free of charge and it is not customary for users in the web of trust to ask for money in exchange for certifying your key. The problem with OpenPGP lies in its complexity. It puts a lot of responsibility and complexity on the shoulders of its end users. This is too much to ask of your everyday user. It’s therefore only used by geeks and maybe some journalists. There are some graphical interfaces that take away some of the complexity, but it is still a difficult tool to use properly.
Putting things into practice
Let’s leave the theoretical part of this post behind and do something practical. I am going to show you how to use OpenPGP. We are going to generate a key pair and do some stuff with it. Ensure that you have followed the steps in the Introduction post before proceeding with this one.
Installing the software
We need an application that implements the OpenPGP standard. GnuPG is the best choice. Open up a terminal/Powershell window and type the appropriate command for your system:
brew install gpg pinentry-mac   # macOS
apt install gnupg               # Debian/Ubuntu
dnf install gnupg2              # Fedora
choco install gpg4win           # Windows
Configuring your system
We will need to do some configuration steps before we can proceed with the key pair generation.
Pinentry configuration on macOS
Configure GPG to use the pinentry-mac program for entering passwords on a macOS system. This program is preferred over the default pinentry program which is shipped with gpg.
echo "pinentry-program /usr/local/bin/pinentry-mac" >> ~/.gnupg/gpg-agent.conf

gpgconf --kill gpg-agent
Set the GPG_TTY environment variable on Linux and macOS
You will need to set and export the GPG_TTY environment variable for the GPG agent on Linux (Debain/Ubuntu/Fedora) and macOS systems:
GPG_TTY=$(tty)
export GPG_TTY
It’s best to add these lines to the startup script of your shell. Choose the right command for the shell you are using:
# Bash shell
echo 'export GPG_TTY=$(tty)' >> ~/.bashrc

# Zsh shell
echo 'export GPG_TTY=$(tty)' >> ~/.zshrc

# Fish shell
echo 'set -gx GPG_TTY (tty)' >> ~/.config/fish/config.fish
Info
Bash is the default shell on most Linux systems. Zsh is the default shell on macOS. You can figure out which shell you are using by running the following command echo "$SHELL"
This will make sure that the prompt for password entry is displayed in the proper terminal window.
Enable SSH support for the GPG agent on Linux and macOS (optional)
The GPG agent allows you to use your GPG authorization key for SSH access. You can skip this step if you are not interested in using your key for SSH authentication. Follow the following steps to enable it:
Step 1: Enable SSH support in the agent configuration file:
echo 'enable-ssh-support' >> ~/.gnupg/gpg-agent.conf
Step 2: Configure SSH to use the GPG agent for authentication:
# Bash shell
echo 'export SSH_AUTH_SOCK ~/.gnupg/S.gpg-agent.ssh' >> ~/.bashrc
# zsh shell
echo 'export SSH_AUTH_SOCK ~/.gnupg/S.gpg-agent.ssh' >> ~/.zshrc
# Fish shell
echo 'set -gx SSH_AUTH_SOCK ~/.gnupg/S.gpg-agent.ssh' >> ~/.config/fish/config.fish
Step 3: Restart the agent:
gpgconf --kill gpg-agent
gpgconf --launch gpg-agent
Step 4: Close and reopen your terminal. The configured environment variables should now be set (you can check this by running the env command)
Warning
These steps will only work on Linux and macOS systems. Windows users often use applications such as Putty or Kitty to establish SSH connections to Linux servers. I don’t know if this kind of setup is possible with these kind of applications.
Generating keys
Now it’s time to generate our key pair.
Step 1: First you will have to generate your master key. The code block below shows the command you need to run in your terminal on the first line. The rest of the lines show the answers to the questions the gpg application will ask. Replace the answers to the ‘Real name’, ‘Email address’ and ‘Comment’ questions with your own information.
gpg --full-generate-key
Your selection? 4
What keysize do you want? (3072) 4096
Key is valid for? (0) 6y
Is this correct? (y/N) y
Real name: John Doe
Email address: john.doe@example.com
Comment: John's key
Info
Just like a driver license or passport, a key pair has an expiration date. You are free to choose this date during the creation of your key. The key generated in the code block above, is valid for 6 years. You will have to create a new master key when the old key is about to expire.
Step 2: Verify the key has been created and note down its ID:
gpg -K --keyid-format 0xshort
/home/john/.gnupg/pubring.kbx
----------------------------------
sec   rsa4096/0xFC1B1408 2022-07-07 [SC] [expires: 2028-07-05]
      26B6896326F977B6FA0DBE4B1D047E24FC1B1408
uid           [ultimate] John Doe (John's key) <john.doe@example.com>
The code block above shows the command to display the key information. It also shows example output. The key ID in this example is 26B6896326F977B6FA0DBE4B1D047E24FC1B1408 and its short version is 0xFC1B1408. Your own ID will look different. Ensure that you replace 0xFC1B1408 with your own ID in the next steps.
Info
The created master key allows you to do 2 things:
- Certify other keys. This allows you to create trust relationships with others
- Digitally sign any file or piece of text
Step 3: Add an encryption subkey to your master key:
gpg --edit-key 0xFC1B1408

gpg> addkey
Your selection? 6
Key is valid for? (0) 2y
Is this correct? (y/N) y
Really create? (y/N) y
gpg> save
Info
It is best practice to create separate key material for signing and encryption purposes. The encryption key can have a shorter expiration date than the master key and can be easily rotated.
Step 4 (optional): Create a subkey for authentication. You can skip this step if you are not planning to use GPG for SSH access:
gpg --expert --edit-key 0xFC1B1408

gpg> addkey
Your selection? 8
Your selection? A
Your selection? S
Your selection? E
Your selection? Q
Key is valid for? (0) 2y
Is this correct? (y/N) y
Really create? (y/N) y
gpg> save
Step 5 (optional): Backup your keys. The following command will create backup files in the current working directory:
gpg --armor --output private.asc --export-secret-key 0xFC1B1408
gpg --armor --output sub_private.asc --export-secret-subkeys 0xFC1B1408
gpg --armor --output public.asc --export 0xFC1B1408
Move these files to a save place. It is recommended to move then to removable storage like a USB stick or CD/DVD. You can also print the keys to paper since they contain plaintext characters.
Step 6 (optional): Save your public SSH key if you created an authentication key and enabled SSH support:
ssh-add -L > id_rsa.pub
You can then copy the contents of the id_rsa.pub file to the systems you need access to.
Creating trust relationships
In order verify signatures or encrypt messages, you will need to import, trust and sign the public keys of others.
Step 1: Import the key of the person you want to create a trust relationship with. You can import from a file of paste the key directly in to your terminal:
# Import from file
gpg --import public.asc
# Paste directly into terminal
gpg --import
# Then just paste the key and hit the ctrl+d key combo on your keyboard
Step 2: Open an edit shell for the newly imported key:
gpg --edit-key 0x12345678
Replace 0x12345678 with the key id of the imported key from step 1. You can list all key id’s with: gpg -k --keyid-format 0xshort.
Step 2.1: Trust the key:
gpg> trust
# Please decide how far you trust this user to correctly verify other users' keys
# (by looking at passports, checking fingerprints from different sources, etc.)
#
#  1 = I don't know or won't say
#  2 = I do NOT trust
#  3 = I trust marginally
#  4 = I trust fully
#  5 = I trust ultimately
#  m = back to the main menu
#
Your decision? 3
Feel free to make a different decision based on your own preference.
Warning
Ensure you know that is meant by trust. You don’t decide how far you trust the owner of the key in general. You decide how far you trust the owner to correctly verify the keys of other users.
Step 2.2: Sign the key with your own key using the lsign or sign command. The following example uses the sign command:
gpg> sign
Really sign? (y/N) y
Info
The lsign (local sign) command will only keep the generated signature locally. The signature will never be exported or uploaded to a key server. This is handy for when you want to communicate with someone, but do not want to vouch for them in public.
Step 2.3: Use the save command to save the made changes and close the shell.
Step 3 (optionally): Share your key signature with the user of the imported key:
gpg --armor --output public.asc --export 0x12345678
Replace 0x12345678 with the key id of the imported key from step 1. The exported key will include your signature. The owner of the key can then import the updated key in their own keyring.
Info
The process of transferring, importing and exporting key files can be quite the hassle. You can simplify the process by using a key server. I will explain how to use such a key server in a later section in this blog post.
Using your key to sign stuff
You can use your key to sign a piece of text or file. Signing provides integrity and nonrepudiation. Any change to the singed content will invalidate the signature. You create the signature with your private key and other people can verify your signatures by using your public key.
Sign and verify a piece of plaintext
You can sign a piece of plaintext by following these steps:
Step 1: Open a terminal or Powershell window and run the following command:
gpg --armor --clear-sign
Step 2: Type or paste your message in the terminal window.
Step 3: Press ctrl+d to signal GPG that you are done with your message.
Info
The clear sign option keeps the signed message readable. This allows people to read your message without needing to go through the verification process. Using the sign option will embed the message in the GPG block. Go and see the difference for yourself! Follow the steps again, but replace --clear-sign with --sign.
You can verify a piece of text in a similar way. Just replace the command given in Step 1 with:
gpg --verify
Warning
If you created a signed message with the --sign option and want verify and read the contents of the message, you will need to use the --decrypt option instead of the --verify option.
Sign and verify a file
Signing a file goes a bit differently.
Step 1: Assuming the file is in the current working directory and is called ‘foo.pdf’:
gpg --armor --detach-sign foo.pdf
This will create a file called ‘foo.pdf.asc’ in the same directory. GPG will save the signature in a binary format if you leave out the --armor option. The signature file will then have the ‘.sig’ extension instead.
Info
GPG saves application output in a binary format by default. The --armor option will order GPG to save the output in a text format instead. Text is easier to work with since it can be placed almost everywhere. You can paste it into an e-mail or a Teams message, host it on a web-site or even print it on a piece of paper if you want to. My recommendation is to use the armor option by default and only leave it out when encrypting files since they can be quite large. Output files created with the armor option enabled will have a ‘.asc’ extension. Binary files will have the ‘.gpg’ or ‘. sig’ extensions.
Step 2: Verify the file with:
gpg --verify foo.pdf.asc foo.pdf
Info
Using the --detach-sign option will cause GPG to save the signature in its own file. This the preferred way of doing it because it keeps the singed file in a readable format. You can also choose to embed the signed file in the signature by using the --sign option instead. And just like with the plaintext singing, you will need to use the --decrypt instead of the --verify option to verify and read the embedded file.
Encrypting stuff for others
Apart from singing text and files, you can also encrypt text and files for others. This functionality ensures confidentiality by making your message only readable for the intended recipients of the message. Ensure you have imported and created trust relationships with the public keys of the recipients of your encrypted message. It is also best practice to sign your encrypted messages, so the recipients can verify that the message came from you.
Sign and encrypt a piece of text
The following steps explain how to sign and encrypt a piece of plaintext.
Step 1: Open a terminal or Powershell window and run the following command:
gpg --armor --encrypt --sign
Step 2: The application will ask you to add the recipients for your message. You can just add them by typing their name or e-mail address. Don’t forget to also add yourself if you also want to be able to decrypt the message.
Step 3: Type or paste your message.
Step 4: Press ctrl+d to signal GPG that you are done.
You can decrypt the piece of text in a similar way:
Step 1: Open a terminal or Powershell window and run the following command:
gpg --decrypt
Step 2: Paste the encrypted message in the terminal.
Step 3: Press the ctrl+d key combination.
Sign and encrypt a file
The following steps explain how to sign and encrypt a file.
Step 1: Assuming the file is in the current working directory and is called ‘foo.pdf’:
gpg --encrypt --sign foo.pdf
Step 2: Add the appropriate recipients. You can just add them by typing their name or e-mail address. Don’t forget to also add yourself if you also want to be able to decrypt the file.
GPG will save the encrypted file as ‘foo.pdf.gpg’ in the working directory.
You can decrypt the file as follows:
gpg --decrypt foo.pdf.gpg > foo.pdf
The decrypted version of the file will be saved as ‘foo.pdf’ in the current working directory.
Using a GUI
Not a command line warrior? No problem! There are different GUI’s you can use to manage keys and handle signing, verification, encryption and decryption operations. A GUI called ‘Kleopatra’ already ships with the Windows version of GnuPG. Look for its shortcut on your desktop. On Linux systems, you will have to install the ‘kleopatra’ package to get the GUI. GNOME users might want to use the Seahorse GUI instead, since it better blends in with the desktop environment.
On macOS you can install GPG Suite if you want a GUI:
brew install --cask gpg-suite
Warning
GPG Suite also comes with a plugin for Apple Mail. The plugin comes with a 30 day free trail and will cost you around € 25 afterwards. You can install the ‘gpg-suite-no-mail’ package instead of the ‘gpg-suite’ package if you don’t want the plugin. More on mail client plugins in the next section.
Using a mail client plugin
Although a bit barbaric, you can just paste the encrypted message in the message body of an e-mail and send it to the intended recipients. Some save the message in a file and add this file as an attachment. This way of working can become quite cumbersome when you have to send a lot of encrypted e-mail and each e-mail has multiple replies you have to read. Luckily there are ways to make your mail client do the heavy lifting. Popular mail clients for Linux systems, such as KMail and Evolution, have builtin support for PGP. Other mail clients will require the installation of a plugin. Here is a list of possible options:
- KMail
- Builtin support
- Only available for Linux systems
- Evolution
- Builtin support
- Only available for Linux systems
- Thunderbird
- Builtin support since version 78
- Available for Windows, macOS and Linux
- Apple Mail
- Needs GPG Suite plugin
- Only available for macOS systems
- Microsoft Outlook
- Needs GpgOL plugin, which ships with GnuPG for Windows (so it should be installed already)
- Available for Windows and macOS systems, but the plugin only works in the Windows version
If you prefer a web-interface, you can take a look at Mailvelope. Proton Mail and Tutanota are also good choices if you don’t mind registering a new e-mail address.
Warning
Letting your mail client handle the encryption process instead of manually pasting it in the e-mail exposes you to some possible risks you should be aware of:
- A plaintext version of the message might be send on accident, because of a bug in the mail application or plugin
- The mail application or plugin might not encrypt the concept message. Parts of the message are then leaked to the mail server
- Modern mail applications use HTML for message composition. These messages have a predictable structure, making them more susceptible to Known Plaintext attacks. Some mail applications allow you to switch to a text format when composing a message
Using a key server
As described earlier: The process of transferring, importing and exporting key files can be quite the hassle. A key server can make things easier. A key server can be seen as a public repository of keys. You can send your own public key to it and receive the public keys of others. You simply need to know their key ID or e-mail address. I am going to use the key server ‘keys.openpgp.org’ in the following steps.
Step 1: Export your public key with the usual command: gpg --armor --output public.asc --export 0xFC1B1408. Be sure to replace 0xFC1B1408 with the ID of your own key.
Step 2: Upload your key using the webform.
Step 3: Confirm your e-mail address.
Step 4: Configure ‘keys.openpgp.org’ as your default key server by adding the following line to your ‘gpg.conf’ file:
keyserver hkps://keys.openpgp.org
The ‘gpg.conf’ file can be found in the ~/.gnupg directory on Linux and macOS systems. On Windows it can be found under %APPDATA%\gnupg.
You can now receive keys in the following way:
# Receive by e-mail address
gpg --auto-key-locate keyserver --locate-keys john.doe@example.com
# Receive by short ID
gpg --recv-key 0xFC1B1408
# Receive by long ID
gpg --recv-key 26B6896326F977B6FA0DBE4B1D047E24FC1B1408
Warning
The most reliable way to receive someone’s key is by using the long ID. You can use the short ID if the long one is too much typing work. Retrieving a key based on e-mail address can be tricky. Not all key servers verify the e-mail address that is used with the key.
Storing your key on a YubiKey
Your private key is stored on your systems internal storage by default. This can create problems when a hacker manages to get access to your system. The hacker can steal your private key file which can used to decrypt your messages and sign things in your name. Protecting your private key with a password does help, but a password can just as easily be captured by using a keylogger. The best way to protect your key is to store on a separate hardware device. A YubiKey is a specialized hardware device which can be used to store different types of key material.
Warning
Ensure you have generated your keys on a system that you know is not already compromised. You might want to boot into Tails and use it to generate the private key and move the key material to the YubiKey. Don’t forget to make a backup of your private key! You can optionally use the persistent storage feature of Tails to store the backup.
The following steps will explain how to move your private key to a YubiKey device:
Step 1: Buy the key on the website of the manufacturer. You will need a 5 series key.
Step 2 (optional): Download and install the YubiKey Manager software. There are different ways to do this. You will have 2 options:
Option 1: Install the platform independent command line Python package. This will require you to install Python and will only give you the command line tool:
# Install Python3

apt-get install python3 python3-pip  # Ubuntu/Debian
dnf install python3 python3-pip  # Fedora
choco install python3  # Windows
brew install python3  # macOS

# Install Yubikey tools

pip3 install --user yubikey-manager
Option 2: Download and install the Yubikey Manager software from the Yubico website. This will give you the GUI and command line tool.
Step 3: Connect the YubiKey to your system.
Step 4 (optional): Verify that the Yubikey is properly recognized on your system. Use the YubiKey Manager GUI or the ykman list command.
Warning
The ‘ykman’ application should be in your path when you installed the Python version. Look for it in the installation directory if you downloaded the installer from the Yubico website. On macOS it should be in ‘/Applications/YubiKey Manager.app/Contents/MacOS’. On Windows it should be in ‘C:\Program Files\Yubico\YubiKey Manager’ (look for the ‘ykman.exe’ file).
Step 5: Verify that the YubiKey is recognized by GnuPG by running gpg --card-status in a Terminal or Powershell window.
Warning
You might run into a situation where the YubiKey is recognized by the YubiKey Management software, but it won’t show up in GnuPG. I personally had no problems on Windows, Ubuntu and Fedora but did stumble into this problem on macOS.
Here is how I fixed it:
Step 1: Add the following line to your ‘scdaemon.conf’ file:
reader-port Yubico Yubikey
The ‘scdaemon.conf’ file should be in the same directory as your ‘gpg.conf’ file. You might need to create it if it does not exist.
Step 2: Restart the scdaemon service with gpgconf --reload scdaemon.
Step 3: The YubiKey should now show up when running the gpg --card-status command.
Step 6: Prepare the YubiKey for use. The following code block will show you how to do this:
gpg --card-edit         # Should drop you in a gpg shell
gpg/card> admin         # Unlock admin commands
gpg/card> kdf-setup     # Extra hardening: Save PIN's as hash instead of plaintext
gpg/card> passwd
Your selection? 3       # Set an Admin PIN. The default is: '12345678'
Your selection? 1       # Set an User PIN. The default is: '123456'
Your selection? Q
gpg/card> name          # Set your name here
gpg/card> lang          # Configure your preferred language
gpg/card> quit
The Admin PIN will allow you to administer the device while the User PIN allows you use the device. You will need the Admin PIN to do things like adding or deleting key material while you will use the User PIN for day-to-day tasks.
Info
The passwd selection menu also allow you to set a Reset PIN. A Reset PIN allows a user to reset their own PIN without needing access to the Admin PIN. The reset PIN is disabled by default. You can leave it disabled if the user and the admin are the same person.
Step 7 (optional): Configure maximum failed PIN attempts. By default the User and Admin PIN’s will be locked after 3 failed attempts. You can change these values with the YubiKey Manager command line tool:
ykman openpgp access set-retries 5 2 3
The command above will:
- Set the maximum retry attempts for the User PIN to 5
- Set the maximum retry attempts for the Reset PIN to 2
- Set the maximum retry attempts for the Admin PIN to 3
Feel free to change these values to suit your own preferences.
Step 8 (optional): Configure require touch. This will require you to touch the key for every GPG operation:
ykman opengpg keys set-touch aut cached
ykman opengpg keys set-touch sig cached
ykman opengpg keys set-touch enc cached
The commands above will configure the Key to require touch for authentication, signing and encryption operations. The action will be remembered for 15 seconds. This ensures the YubiKey will play nice with things like mail client plugins. You might want to set the value to ‘off’ for ‘aut’ if you use things like Ansible. Unless you like touching the YubiKey every 15 seconds during a run, its your party.
Step 9: Move your master and sub keys to the card. The following code block will show you how to do this:
gpg --edit-key 0xFC1B1408
gpg> keytocard  # Move the master key. Set it as the Signature key
gpg> key 1      # Select encryption subkey
gpg> keytocard  # Move the encryption subkey
gpg> key 1      # Deselect encryption subkey
gpg> key 2      # Select authentication key. You can skip this step if you don't have one
gpg> keytocard  # Move the authentication subkey. You can skip this step if you don't have one
gpg> save
Replace 0xFC1B1408 with the key ID of your own key.
Step 10: Verify everything is OK. Your key information should now be listed at the bottom when running gpg --card-status.
Step 11: Try to sign a file or a piece of plaintext. You should get a prompt asking you for your User PIN.
Info
These steps are based on the steps described in the YubiKey Guide. Check out this guide if you need more detailed information. It also describes things like key rotation. Just be aware that this guide has a different key setup than we have created here. We use the master key to certify other keys and create digital signatures. The YubiKey Guide uses the master key for certification only and uses a separate subkey for singing.
Warning
It’s important to know that YubiKeys won’t prevent hackers from using your private keys, it does prevent them from stealing the keys. A hacker can simply wait for you to plugin and unlock your YubiKey and then start to decrypt and sign stuff, but the hacker will loose access once the YubiKey is pulled from the machine.
Closing words
As you can see from the instructions above, properly setting up mail encryption can be a strait up nightmare for non-technical people. I wouldn’t dare to ask my grandparents nor my parents to set this up. I think this is also the main reason why end-to-end mail encryption will never become mainstream. And this is a problem since new privacy regulations in the EU disallow companies from sending personal information in the clear. This forces companies to limit communications over e-mail. Some have even decided to stop communicating over it altogether.
About a month ago, I wanted to end an insurance contract. I send an e-mail to the insurance company and got an automated reply back instantly. The reply stated that the company had stopped all customer communications over e-mail. I ended up canceling my contract through WhatsApp. Each business ends up with its own solution to the problem. They request you start a chat session on their website or message them through certain chat clients.
I have also seen some creative solutions. One company had sent me some personal information which was saved in an encrypted PDF attachment, but the password was my zip code, which could be easily bute-forced or obtained with some OSINT work. “The law says we must encrypt all personal information, but nobody said anything about using strong passwords” they must have thought. It made me chuckle a bit.
This whole situation saddens me. With e-mail, you have the possibility to freely select your e-mail provider and your e-mail application. You can even become your own provider by setting up a mail server yourself. Most chat platforms don’t give you this kind of freedom. You are forced to use the applications provided by the platform owner and are also forced to send all communications through their systems. This is all fine then the platform is still in the public’s good graces, but things get difficult when it comes into dispute and users want to leave.
Many experienced this when Facebook took over WhatsApp. People wanted to leave and fled to Signal, but many remained on WhatsApp. All my colleagues and geek friends moved to Signal, while all my family and non-geek friends stayed on WhatsApp. I ended up with both applications installed on my phone. I will be talking more about chat platforms in the next blog post since it will be about this very subject.